|
|
Paper Slide Videos |
What is a Paper Slide Video?
A paper slide video is a low-tech meets high-tech project that is adaptable for any grade level and subject area. Students create their own slide show on paper "slides" that they record while narrating the information contained in the slides. Take a look at the video below for a great overview of how Paper Slide Videos work!
Highlights for Paper Slide Videos
- One take, no editing!
- Students work in teams comprised of:
- Videographer
- Paper Slider
- Narrator
- Illustrator, etc...
- PRACTICE is necessary for making sure the video is clear and concise.
- Record the video using an iPad for best results.
Resources for planning your Paper Slide Video Project:
Paper Slide Planning Sheet
Discovery Education's SOS Strategy How-to: Paper Slide
Ideas for Paper Slides in the classroom:
Paper slide videos are great as a group activity, but can also prove to be a powerful presentation tool that students can complete individually.
- Summary of a reading
- Describing a scientific process
- Explaining steps in a math problem
- Presenting information on any given topic
Paper slide videos are great as a group activity, but can also prove to be a powerful presentation tool that students can complete individually.
Recording and Sharing your video
To record the videos, just use the Camera app for iPhone or iPad. That way all the videos are saved to your camera roll.
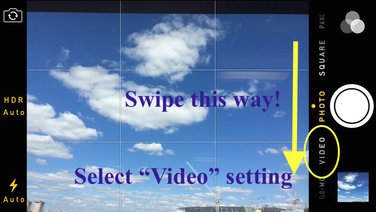
Make sure you swipe to change the operation from "Photo" to "Video"
Make sure you swipe to change the operation from "Photo" to "Video"
You should make time to allow students to watch their creations as a class- they will be asking about them until you do! If you have a VGA adapter that allows you to project from your iPad to SmartBoard, that will be your easiest option for viewing the videos.
If you do not have an adapter, or if you are planning on sharing the videos with parents or other teachers, it's best that you upload the videos to your Google Drive, by downloading the Google Drive app on the same device you recorded with.
For directions on uploading files from an iPad/iPhone to Google Drive see this page.
Earn your badge!
- Incorporate a paper slide activity in your lesson
- Have students create and record their videos
- Upload your video to Google Drive
- Share your video with Libby Ferrell
